

1. Project #
Automatic Project Addition
Your register company is automatically added to the project.
Editing Project Information
To add more information to a project, click the Action option and select the Edit icon.
This will open an edit modal where you can update the project details.
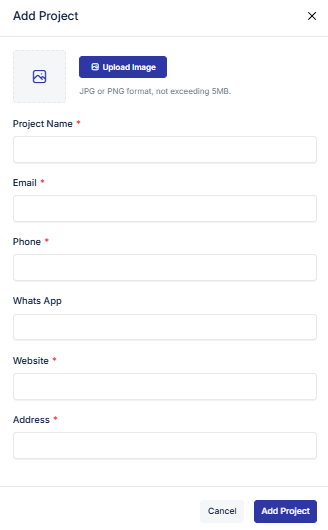
Adding New Projects
If you need to add more projects, click the Add Project button.
Fill in the project information and save it.
Deleting Projects
To delete a project, go to the Action option and click the Delete icon.
Setting a Default Project
Use the Default button to set a project as default.
The default project information will be shown in PDFs, other documents, and emails.
2. City #
When you add a city in the setup, it will appear in various places such as patient registration, staff registration, invoices, and more.
Adding
Click the Add City button. Fill in the necessary information and save it.
Editing
Click the Action option and select the Edit icon. This will open an edit modal where you can update the information.
Deleting
To delete, go to the Action option and click the Delete icon.
3. Thana #
In the Thana section, you can add a Thana under a city that you have already added in the City section. The process is similar to the City section, but you need to select the city under which the Thana will be added.
4. Delivery Charge #
In the Delivery Charge section, you can add a delivery charge for a specific Thana. You can also apply the same delivery charge to multiple Thana’s at once. This charge will appear on all types of invoices, including account invoices, pharmacy invoices, lab invoices, and more.
5. Service Charge #
Same as Delivery Change
6. Collection Charge #
Same as Delivery Change
7. Integration #
Here you can add Email, WhatsApp, and SMS integration to enable sending messages such as invoices, attendance updates, leave notifications, or other customer and staff communications.
1. Email Integration
You can integrate email using three different methods: Gmail, Hosting SMTP, and Outlook.
Gmail
- For Gmail integration, you need to input the required fields (such as email, password, SMTP server, and port).
- For detailed setup instructions, you can visit:
Send email from a printer, scanner, or app – Google Workspace Admin Help 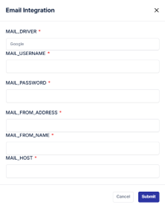
- Hosting (Custom Domain SMTP)
- You can send emails using your custom domain email.
- Enter the necessary input requirements such as:
- SMTP server address
- Port number
- Username and password
- This allows you to send emails directly from your own domain.
Outlook
- You can also integrate email using Outlook.
- Input the required Outlook SMTP/IMAP settings.
- For more information, you can visit:
POP, IMAP, and SMTP settings for Outlook.com – Microsoft Support 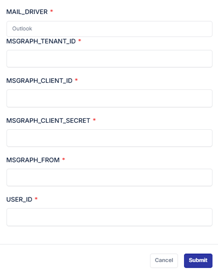
✅ After Integration
- Once configured, your system can send:
- Invoices via email
- Leave notifications
- Attendance updates
- Other staff and customer communications
2. WhatsApp Integration Guide
This feature allows you to integrate WhatsApp with your system to send important messages such as invoices, leave notifications, attendance updates, and other customer or staff communications directly through WhatsApp.
🔧 Steps to Integrate WhatsApp
- Enter Instance Name
- Begin by providing a unique Instance Name in the integration setup screen.
- This name will help identify your WhatsApp connection.
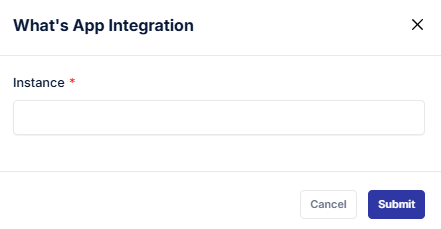
- Generate QR Code
- After entering the instance name, a QR code will appear on the screen.
- This QR code is required to link your WhatsApp account.
- Open WhatsApp on Your Phone
- Launch the WhatsApp application on your mobile device.
- Tap the three-dot menu (⋮) in the top-right corner.
- Go to Linked Devices
- From the menu, select Linked devices.
- Tap Link a device to open the QR code scanner.
- Scan the QR Code
- Use your phone to scan the QR code displayed on your system.
- Once scanned, your WhatsApp account will be successfully linked.
✅ After Integration
- You can now send automated messages such as:
- Invoices to customers
- Leave notifications to staff
- Attendance updates
- Other customer and staff communications
- All messages will be delivered directly through WhatsApp, ensuring fast and reliable communication.


