The Family Portal is integrated with the patient portal, functioning similarly to an e-commerce site for product management. Data from the Family Portal is displayed across various menus within the patient portal.
1. Home Visit #
The Home Visit menu allows patients to purchase home visit services directly through the patient portal.
Adding a New Home Visit
Click the Add New button to open a modal.
Select the service name, service name come from Settings > Account Settings > Subcategory. The price will automatically populate based on the selected subcategory.
Upload an image of the service, which will be displayed in the patient portal.
Click Submit to save the home visit.

Editing a Home Visit
To edit a home visit, click the Action option and select the Edit icon.
This will open an edit modal where you can update the service details.
Make the necessary changes and click Update.
Deleting a Home Visit
To delete a home visit, go to the Action option and click the Delete icon.
2. Procedure #
The Procedure section functions similarly to the Home Visit section, allowing patients to purchase various procedures through the patient portal.
Adding a New Procedure
Click the Add New button to open a modal.
Select the procedure name from Settings > Account Settings > Subcategory. The price will automatically populate based on the selected subcategory.
Upload an image of the procedure, which will be displayed in the patient portal.
Click Submit to save the procedure.
Editing a Procedure
To edit a procedure, click the Action option and select the Edit icon.
This will open an edit modal where you can update the procedure details.
Make the necessary changes and click Update.
Deleting a Procedure
To delete a procedure, go to the Action option and click the Delete icon.
3. Allied Health #
Same to Home Visit and Procedure
4. Pharmacy (if you have subscribed pharmacy module) #
Same to Home Visit and Procedure
5. Diagnostic Lab (if you have subscribed lab module) #
Same to Home Visit and Procedure
6. Instrument Rent #
Same to Home Visit and Procedure
7. Promo Codes #
You can create promo codes here, which users can apply in the patient portal during checkout to receive a discount.
Adding a New Promo Code
Select the service name from Settings > Account Settings > Subcategory.
The promo code will be automatically generated, but you can change it if needed.
Input the discount amount, which will be deducted from the total amount.
Specify the start and end dates for the promo code validity.
Click Submit to save the promo code.

Editing a Promo Code
Click the Action option and select the Edit icon.
This will open an edit modal where you can update the promo code details.
Make the necessary changes and click Update.
Deleting a Promo Code
To delete a promo code, go to the Action option and click the Delete icon.
8. Agreement Text #
The agreement text will be displayed in the form agreement body. You can add and manage this text to be shown in various forms.
Creating an Agreement Text
Click the Add Agreement button.
Input the agreement name and click Submit.
Once the agreement text is added, select the agreement name.
Input the agreement text and click Update to save it.

#
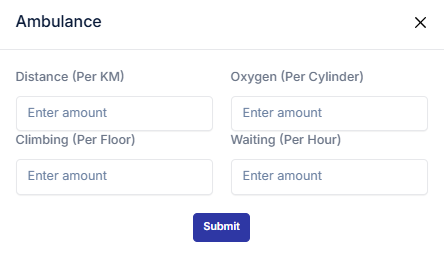
9. Ambulance Integration #
This section allows you to configure ambulance service charges. The system will automatically calculate costs based on the parameters you define and integrate them into the User Portal and Invoice.
Setup Ambulance Charges
You can add and manage the following calculation amounts:
- Distance Charge (per KM)
- Define the cost per kilometer traveled by the ambulance.
- Oxygen Charge (per Cylinder)
- Set the amount charged for each oxygen cylinder used during service.
- Climbing Charge (per Floor)
- Specify the charge for climbing each floor when patient pickup or delivery requires stairs.
- Waiting Charge (per Hour)
-
- Enter the hourly rate for waiting time during ambulance service.
Integration with User Portal & Invoice
- Once configured, these charges will be automatically applied when generating ambulance service invoices.
- The User Portal will display the calculated charges clearly for transparency.
- The Invoice will include a detailed breakdown of:
-
- Distance cost
- Oxygen usage
- Climbing charges
- Waiting time charges
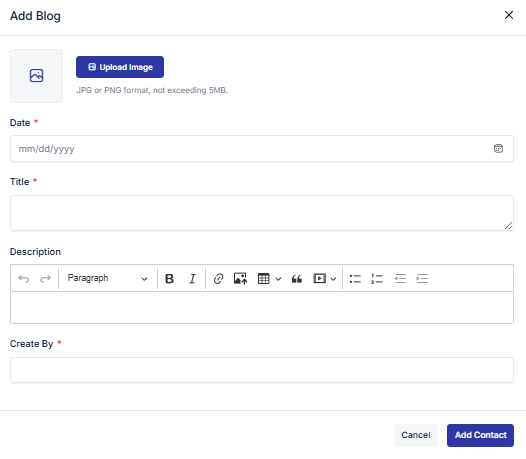
10 Blog #
This section allows you to add and manage blogs that will be displayed in the Patient Portal. Blogs can be used to share updates, health tips, announcements, or any other relevant information with patients.
Adding a Blog
When creating a new blog entry, you can fill in the following fields:
- Date
- Select or enter the date of the blog post.
- Title
- Provide a clear and descriptive title for the blog.
- Description
- Write the main content of the blog post.
- This can include health information, announcements, or any message you want to share.
- Created By
- Enter the name of the person or department who authored the blog.
- Image
-
- Upload an image to accompany the blog post.
- This helps make the blog visually engaging for patients.
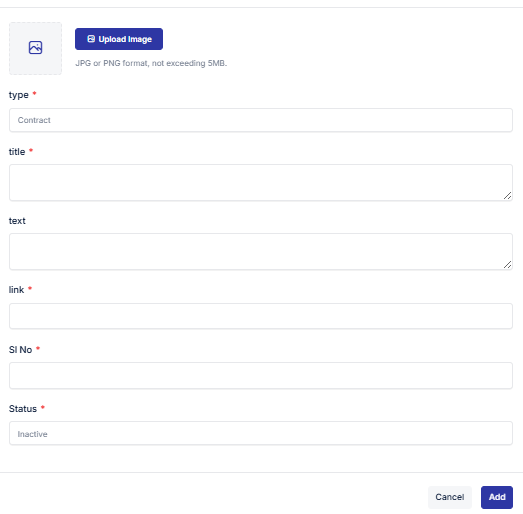
11. Contract Info #
This section allows you to add and manage contract information that is directly connected to both the Patient Portal and the Staff Portal. It ensures that important contact and helpline details are easily accessible.
Adding Contract Information
When creating or updating a contract entry, you need to fill in the following fields:
- Type
- Select the type of contract information:
- Contact (general contact details)
- Helpline (emergency or support helpline)
- Select the type of contract information:
- Title
- Provide a clear title for the contract information (e.g., “Emergency Helpline” or “HR Contact”).
- Text
- Enter the description or details of the contract information.
- Link
- Add a URL link if the contract information requires external reference (e.g., hospital website, support page).
- SL (Serial Number)
- Assign a serial number to maintain order and easy identification.
- Status
- Choose whether the item is Active or Inactive.
- Active items will be visible in the portals, while inactive items will be hidden.
- Icon Upload
- Upload an icon to visually represent the contract information (e.g., phone icon for helpline, envelope icon for contact).